The Queen of Hearts is one of the most memorable characters from Alice in Wonderland, a story full of unique characters. Because Lewis Carrol’s book (originally called Alice’s Adventures in Wonderland) has been adapted so many times, there are many different versions of the famously irrational queen. There’s the color blocked animated version, the quirky Helena Bonham Carter version, the playing-card-like version from the original book’s illustrations, and many more.
Because there are so many different versions of the Queen of Hearts, when putting together a Queen of Hearts costume, you really just have to make sure you incorporate a few key elements. Which are: red and black coloring, a crown, and lots of red hearts. This fabulous (and easy!) DIY version from Make It Yourself Girl does all that and more. Let’s take a look at how you can make your own easy DIY Queen of Hearts Costume.
DIY Queen of Hearts Costume Step 1: Playing Card Crown
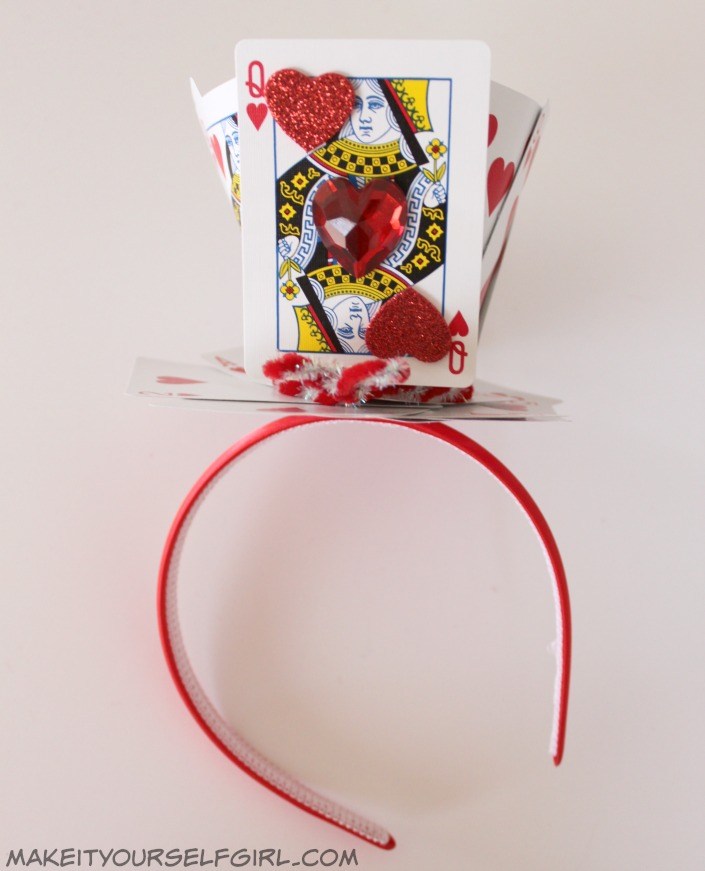
This playing card crown is as adorable as it is easy to make. To make this, you’ll need:
- A deck of cards (including the Queen of Hearts card)
- Hot glue gun and glue
- A red head band
- Heart stickers or heart-shaped gems
- Red and silver pipe cleaners
First, make the base and the rounded top. For the base, just place some cards down randomly and glue together using your glue gun. For the top, you’ll need to fan some cards in a circle and glue them together. After you have these two pieces made, glue them together, let them dry, then glue the base to your red headband. To cover the glue lines, wrap some red and silver pipe cleaners around the top of the crown.
Finally, glue the Queen of Hearts card to the front of your crown and decorate with as many heart-shaped stickers as you like.
DIY Queen of Hearts Costume Step 2: Card Neck Ruff
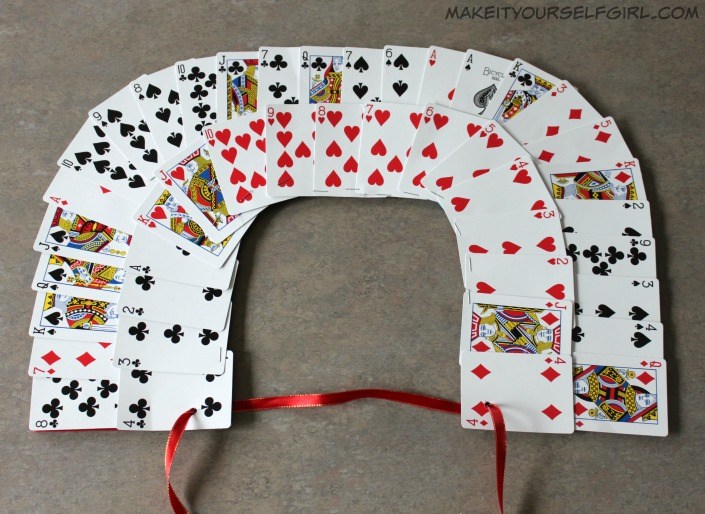
Nothing says “queen” quite like a neck ruff. And what better neck ruff for the Queen of Hearts than one made from playing cards? To make this playing card neck ruff, you’ll need:
- A deck of cards
- A large sheet of red or black craft foam
- A large bowl
- A pencil
- Hot glue gun and glue
- A stapler
- A red ribbon
- A hole puncher
- Scissors
To make this playing card neck ruff, you’ll first need to make something to attach your playing cards to. Trace the shape of the top two thirds of your bowl onto your large piece of craft foam, then cut out the shape. Next, round off the top edges of the foam piece with your scissors.
Now, it’s time to attach your playing cards. You’ll be doing two rows of cards. Using your hot glue gun, first do the outside layer, slightly overlapping the cards as you go. Next, do the inner layer the same way. If after your glue dries, you notice that your cards won’t stay put due to their weight, you can use staples along the bottom edge for reinforcement.
Finally, use a hole punch to make holes at both the inner sides of the front. Then, lace a ribbon through the holes and use the ribbon as a tie when you wear your card neck ruff.
DIY Queen of Hearts Costume Step 3: Heart Tutu
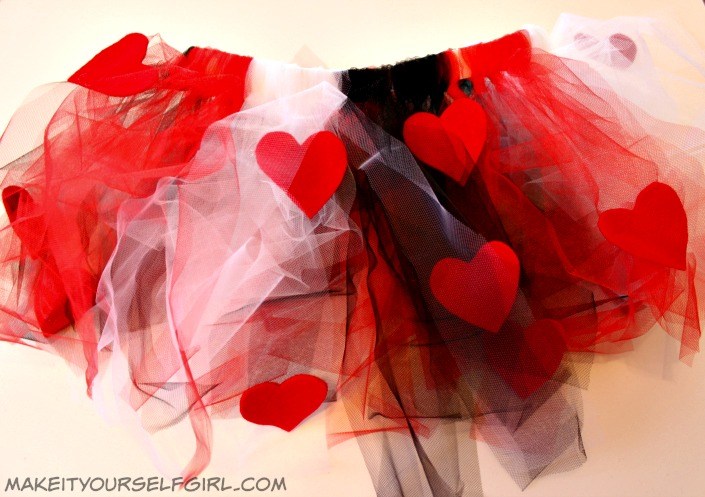
For this part of your costume, you can go one of two ways: you can make your own custom tutu with many colors or you can get a store bought tutu and add heart embellishments. To go with the easier version, you’ll need:
- A tutu in red, white, or black
- Red felt (or red, white, and black felt if you want more colors)
- Scissors
- A small piece of cardboard
- Hot glue gun and glue
To embellish your tutu, first make your hearts. Cut your piece of cardboard into a heart shape, then use it to trace out hearts on your felt. Cut out the hearts, then simply hot glue them all across your tutu!
DIY Queen of Hearts Costume Step 4: Accessories and Makeup

For your Queen of Hearts costume, go with a heart-shaped accessory fit for a queen, like this shimmering heart-shaped necklace.

Make sure to also incorporate your heart motif into your makeup. An easy way to do this is to use red lipstick to make a heart-shaped pout (a la Helena Bonham Carter’s Queen of Hearts). You could also try drawing a heart on your cheek or drawing a large heart around one of your eyes.


 1-855-969-7883
 info@diamondstuds.com


